
When I showed my onion braids a couple weeks ago, I was asked how I did it. I had one kind of onion left to be braided so I took photos as best I could while I did it.
The first step is to dry the onion tops. Make sure when you dry them that they are dried straight up. You don't want them kinked or going all over. They tend to break more that way. Also you don't want them totally dry. Above is probably a touch dry, but OK. I would have done it several days earlier, but since I was on vacation I did it as soon as I got home. The drier the leaves are the less they will shrink and the tighter your onion braid will be. The less dry they are the easier they are to braid since they are still pliable.
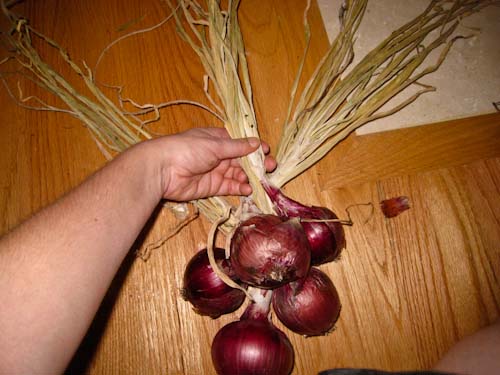
 The second step is to sort them. You want the largest onions in the middle of the braid. So count the onions and divide by three. I had eighteen in this group so I took the six largest onions. And sorted them (lower onions left to right) by how big they were. Then I took the rest and put then next biggest two with the largest onion (on my left). Then the next biggest with the next large onion down the row. So you have a bunch of groups of three. In each is one larger onion and two that are smaller but about the same size as each other. The photo above shows them all sorted.
The braid starts with the largest of the groups of three (one on the left) and it works its way to the smallest of the groups of three. You are making a braid. I'm going to assume you know how to braid. But this is more like a French braid. So as you go along you will add to your braid. To help with the structure I cut a long piece of string that should be a couple feet longer than twice the length that your braid will be at the end. Say about 5-6 feet, but it really depends upon how many onions you are using and how large the onions are.
 Take the first three with the largest one in the middle and tie them together toward the bulb. You should make the knot in the middle of the string. The string will be part of your braid. Put one end of the string with one onion and one with another. It doesn't matter which ones get it, but make sure the strings are in different parts of the braid.
 Get the next set of three onions. Take the largest and put the bulb in the middle and the tops in the middle. The tops will ALWAYS be put in the middle, but the bulbs will be put to make the braid look nice. So the large one in the middle and the small ones to either side. Right now only put the large one in the middle.
 Then fold the right side leaves over so it is now in the middle (if it has a string make sure the string comes with it).
 Now put one of the smaller onions on the right side, but with the tops in the middle. Then fold over the left side, so it is in the middle.
 Next put the other small onion on the left side with the tops in the middle. Then fold over the right side into the middle. Keep going like this. When adding a new onion always go large one in the middle first, small one on the right second, and small one on the left last. And always alternate folding over right, left, right, left...
 When you are done add in a few more braids, so you can see the braid coming out from underneath the onions. Then take the two strings - one on the left and one on the right and tie them together in the front. Then loop them around very tightly several times in opposite directions and tie them off in the back. To make a loop to hold them tie the two strings together in the back a few inches from the knot going around the stems.
 Loop to hang onions
 When you are all done cut off the tops evenly about four inches above the knot (you need a lot if your onions were fairly green when you braided because the leaves will shrink as they dry and the string will loosen, but not too much if your onions were very dry).
I'm so thankful for this info! We really messed up our onions last time because we didn't know what we were doing...it didn't matter since we used them up so quick with the sauce but now we know for the future! Thanks!
ReplyDeleteThanks for sharing - great tutorial!
ReplyDeleteVery informative - thanks for the tutorial! Looks really nice! :) Mia
ReplyDeleteI did not know. When we have the opportunity to try, we'll know where to find the right tutorial. Thanks.
ReplyDeleteThe finished braid is beautiful.
ReplyDeleteBeautiful...gardening can be an art!
ReplyDeleteThank you for posting about this. I was just thinking I needed to learn how to do that!
ReplyDeleteThanks I can never get them right. Diane
ReplyDeleteGreat post Daphne! If I can french braid my own hair....I guess that I can do this too! I'll have to give this a try next year.
ReplyDeleteClear and easy to follow instructions, thanks Daphne. Do you braid your garlic the same way? Norma Chang
ReplyDeleteThanks for the comments all. And it is easier I think than French braiding your own hair. I always have trouble with that.
ReplyDeleteWhat a great post! I am inspired to try.
ReplyDeleteSo pretty and a space saver to have the braided onions hanging in the pantry. I may give this a try with the onions I harvested this week.
ReplyDeleteWhat a great post! I have wanted to know how to do this so I was so happy to see your post and your onions look so pretty!!
ReplyDeleteI always make a royal mess of things doing braids... so I use mesh bags to store the onions and garlic in instead! I cheat I know! LOL!
ReplyDeleteThose red onions are beautiful all by themselves let alone all dressed up in a braid. Thanks for the tutorial, I am almost inspired to try this once again.
They do look so nice all braided up like that, thanks for the lesson in braiding. Perhaps I will try to do some of ours up this fall.
ReplyDeleteHi, another braider ;)
ReplyDeleteGreat looking onions you have there. My red ones got mould this summer, to much rain.
Thank you for sharing this tutorial! This year I planted hundreds of onions, so I will definitly be putting this to use. If you have a chance, I would love for you to share this with Gallery of Favorites.
ReplyDeleteThanks for the tutorial, the onion braid looks very pretty.
ReplyDeletethanks!! i will be an onion braiding fool this year!! (8
ReplyDelete